When you want to download data for the app, you probably use the API RESTful interface. All it takes is to ask the server for the data and that’s it! This method works well when the app doesn’t need permanent access to new information. But what to do if the content has to be updated in real-time? A delay can make it impossible for the user to buy an item or make a sports bet, for example. But there’s a solution – WebSockets on iOS. Check out why you should implement them, and how to do it.
RESTful APIs interface – the ways it works and the limitations
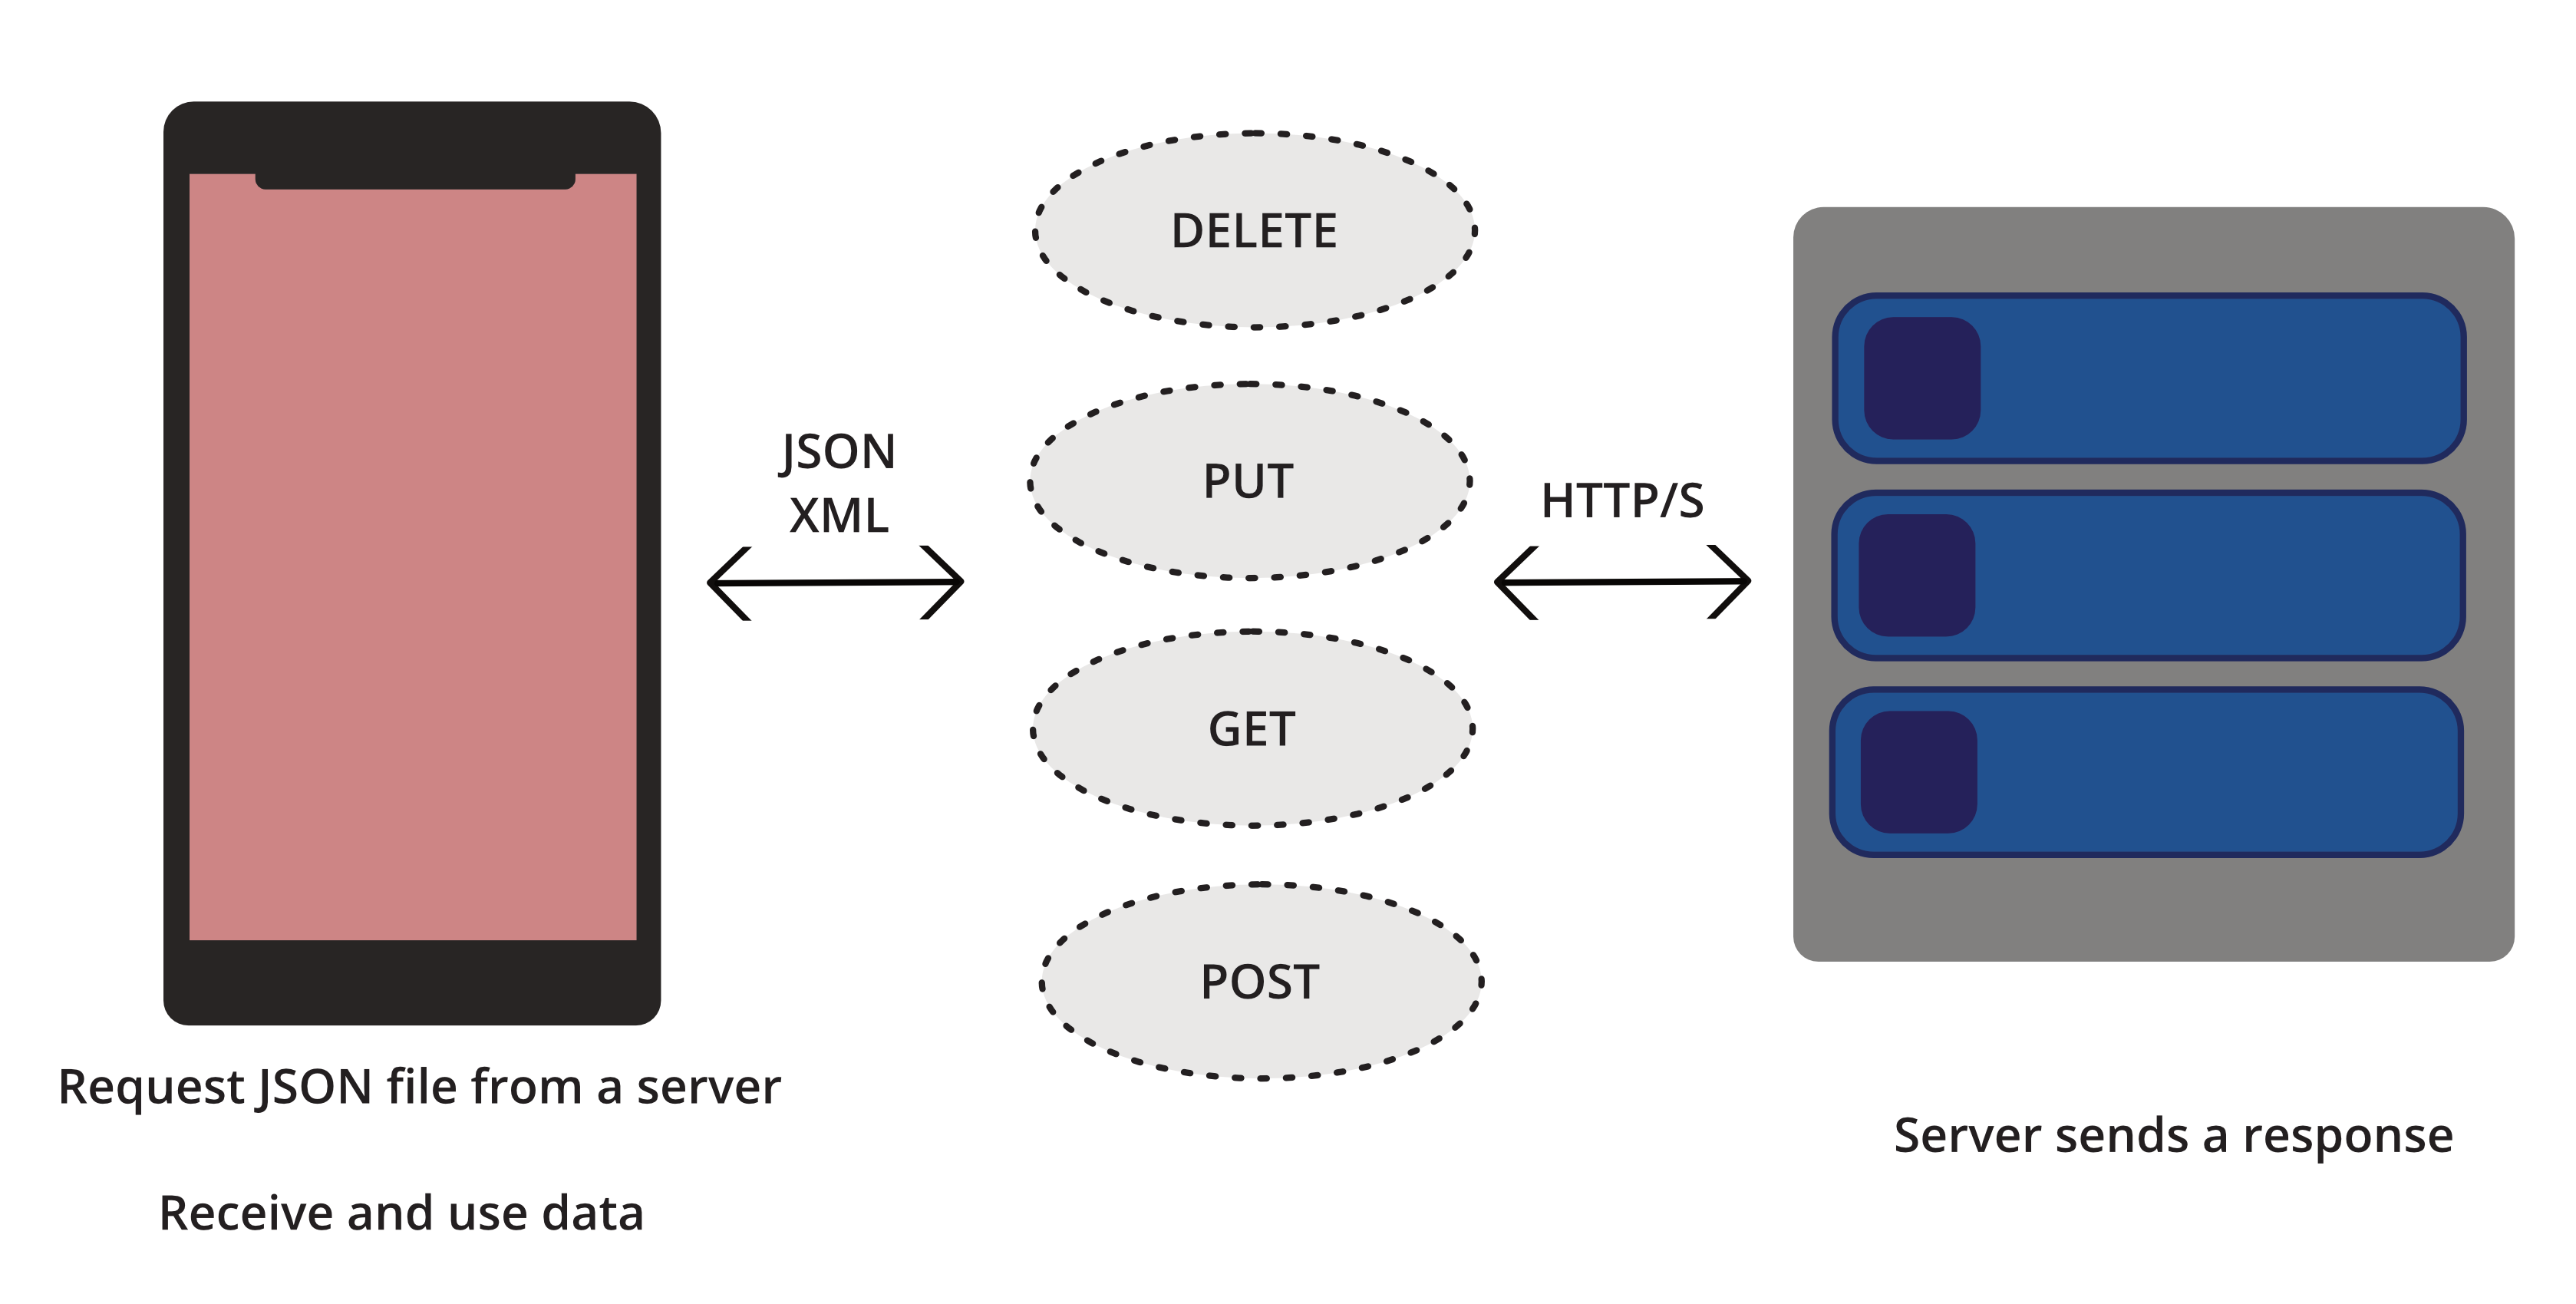
In the case of mobile apps, the transmission of data between a server and a client is a very important issue. Usually, a communication based on RESTful API works best. It’s an architectural style of the application programming interface (API) that relies on HTTP requests in order to access the data and use it.
With the HTTP protocol, the connection works in a send-and-receive mode, as seen in a pattern below:
- Request for a JSON file from a server.
- Receive and use the data.
This is probably the easiest and most popular way of obtaining updates from a server. It’s perfect when there’s no need to frequently update the information. For example, it can be applied when the user displays the information about a product in an online store, uploads his data, or buys an item in the app.
But what can you do when the content needs to be uploaded immediately and real-time communication is a must? It happens sometimes; for example, when users bet on the sports scores, buy actions on the stock market or cryptocurrencies. In those cases, a delay is not an option.
In tennis, no one would want to bet a score of a game if he’d find out that he doesn’t know the current score – it would automatically make him a loser. So, how can you deal with this problem?
RESTful APIs – your way to real-time communication
The first solution that comes to mind is to send requests to a server more often. New requests every minute should work out – it’s not likely that someone would score two goals in a soccer match in one minute. But what about tennis? A lot of things can happen during 60 sec, and users won’t find out about them in time. This way they will lose a chance to bet on the results.
So, maybe a request every 10 sec will do better? Sometimes, it’s not enough. In such a short time someone may list a cryptocurrency for sale. Another person might buy it earlier, and your user will lose a chance to make a transaction. Ok, a request every second, then? This seems perfect, but don’t be fooled. If many users send the requests so often, the server will soon get overloaded. It will result in a longer response time and also in negative reception of the app.
Instead of receiving the latest data, users will struggle with long load time, or they won’t even receive content at all. Such a solution may also cause shorter battery life.
But what if a server could tell your app something? On the iOS platform, it is possible – thanks to WebSockets.
What are WebSockets, and how do they work?
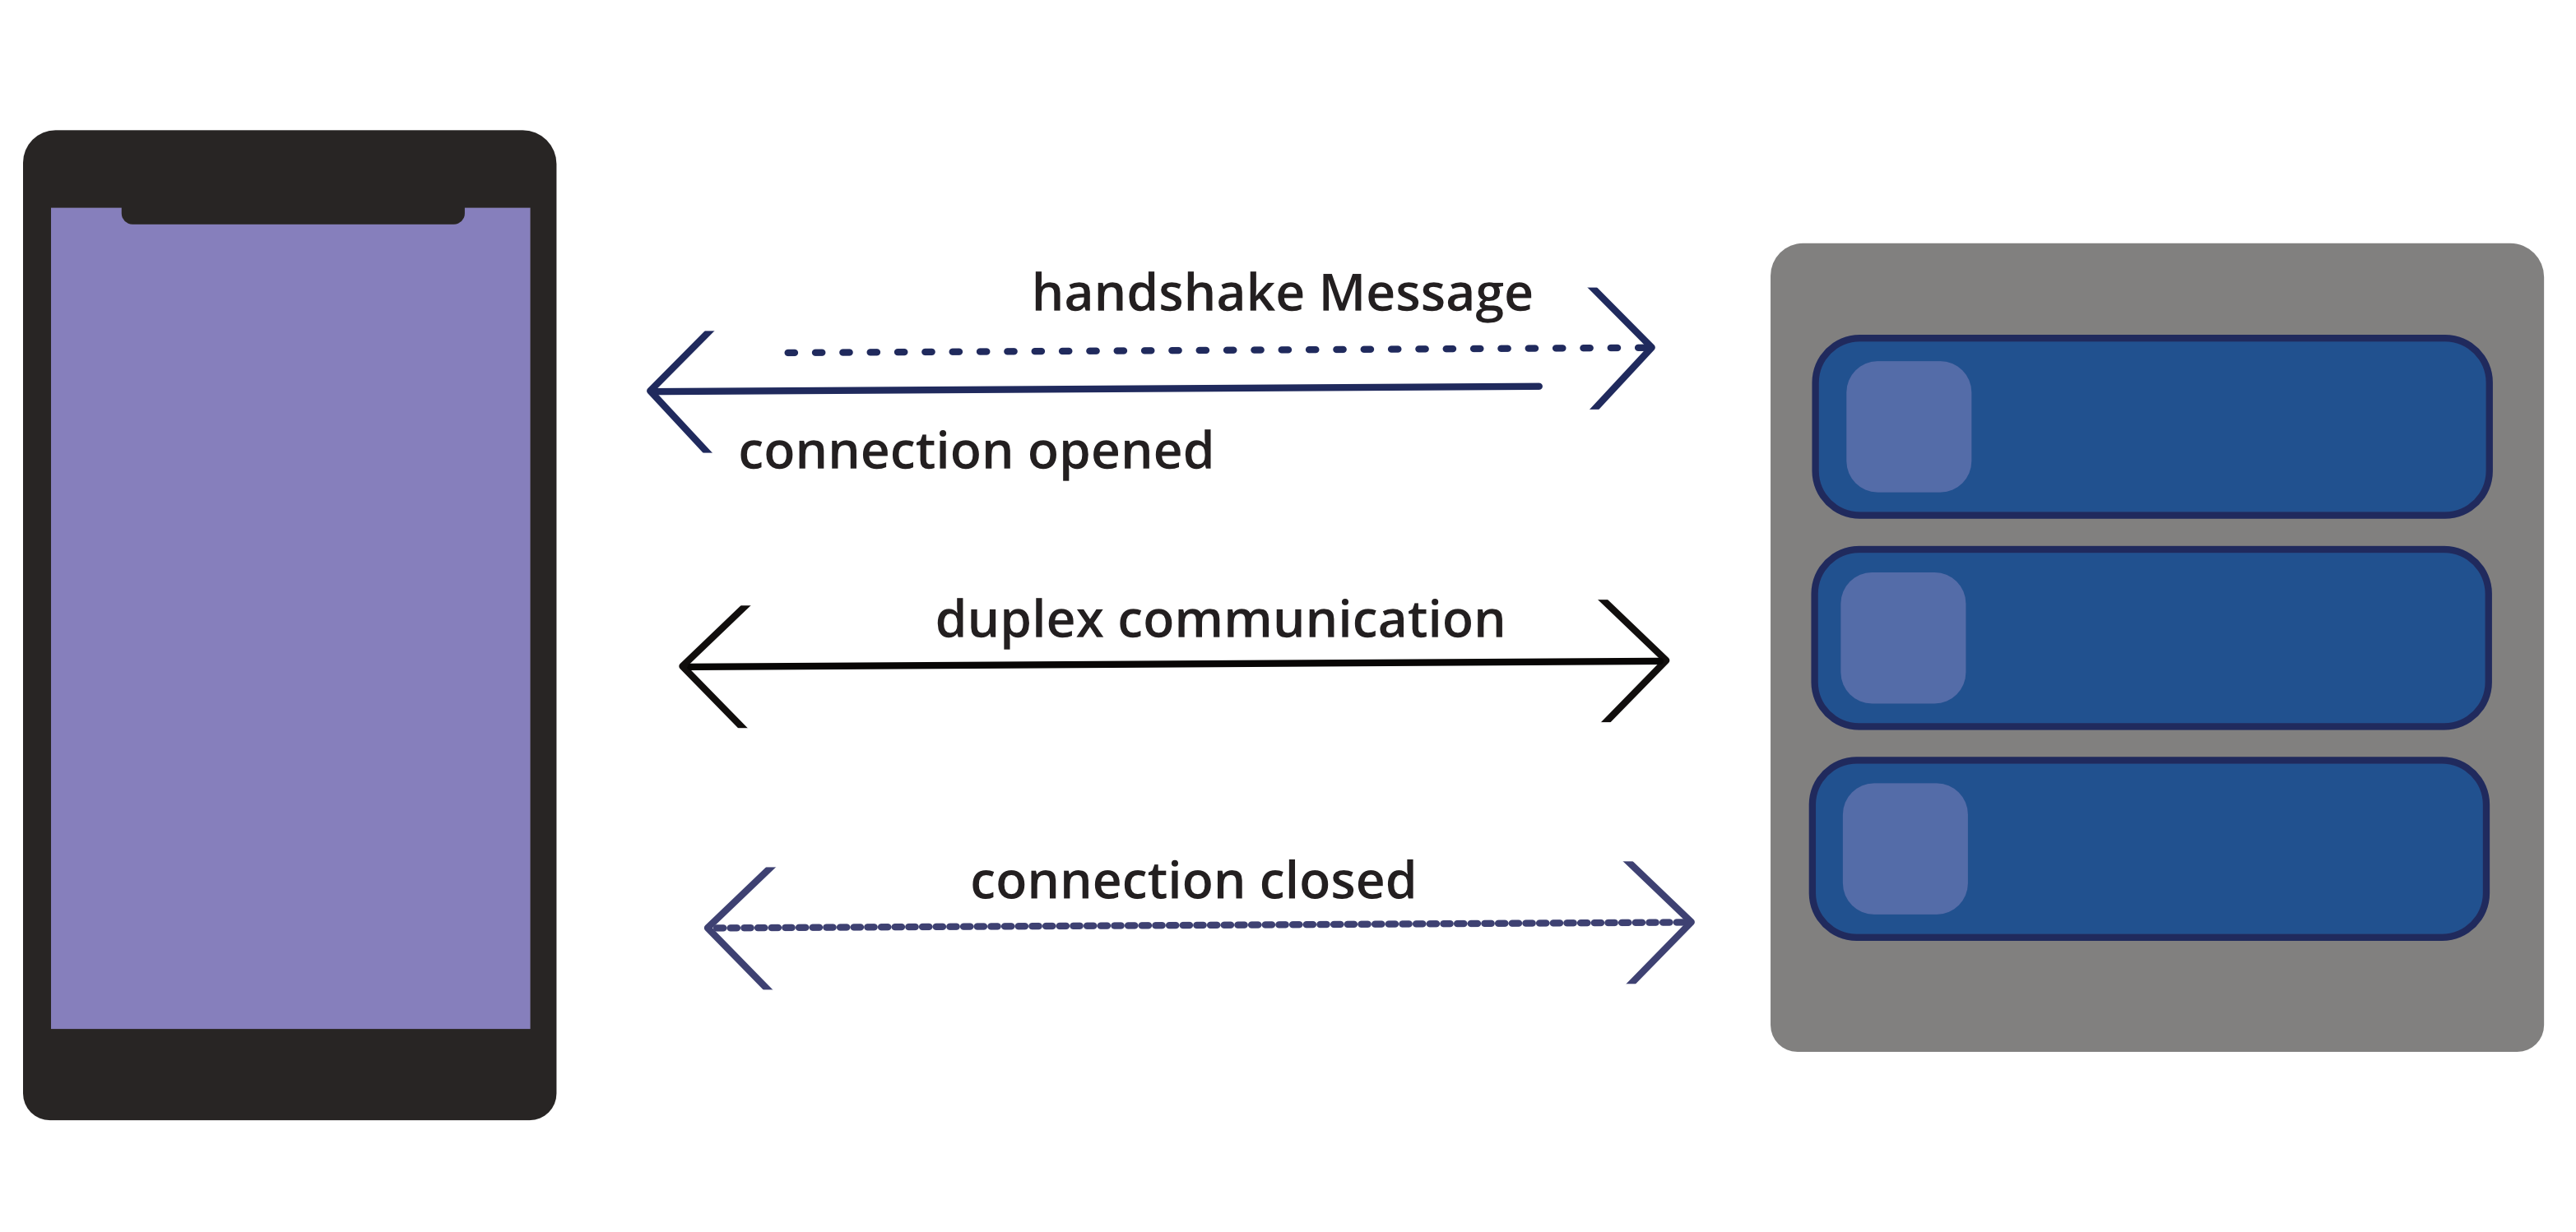
WebSockets are communication protocols – open links that allow duplex communication between a server and a client with a single socket.
WebSockets enable sending messages. They are usually short, so the information could be received as soon as possible.
You might think that sending small data packets stands in contradiction with what I wrote earlier – that when you often send requests to a server, it may get overloaded. But if you use WebSockets, you don’t send requests. You send messages.
WebSocket connection is constantly open, so there’s no worry that a server will get overloaded. It also allows sending the messages more often with the smallest possible delay. Implementation of WebSockets enables sending the content as soon as possible (however, its weight should be very small), and receiving many messages in short intervals.
Using WebSockets is based mostly on 3 activities:
- Connecting to a WebSocket.
- Sending the messages.
- Receiving the messages.
This knowledge allows you to verify whether WebSockets should be used in your project.
Implementation of WebSockets step by step
Downloading the Starscream WebSocket library
Configuration of WebSockets on iOS is not simple, because there is no built-in API interface that would be responsible for it. Instead, Starscream comes to help. It’s a WebSocket compliant (RFC 6455) Swift library.
There are many different ways to add Starscream to a project. The two most popular dependency managers are Carthage and CocoaPods. In this tutorial, I use the latter solution.
What should be done first? Install the library and import it in a Swift file of choice. You might also consider creating SocketManager that will be responsible for managing the sockets.
import Starscream

final class SocketManager {}
Connection with WebSocket Server on iOS
The next step is to establish a connection and set up a delegate. You can do this with the code below:
  func setupSocket() {
    socket = WebSocket(url: URL(string: APIConstants.socketBaseURL)!)
    socket.delegate = self
    socket.connect()
  }
Take a look at the format of a URL address: static let socketBaseURL = “wss://…”. It’s a WS protocol, not HTTPS or HTTP.
Delegate methods
When the connection is established, you need to implement several delegate methods:
func websocketDidConnect(socket: WebSocket) {}– it’s called right after a WebSocket client is connected to a server.func websocketDidDisconnect(socket: WebSocket, error: NSError?) {}– it’s called right after a client is disconnected from a WebSocket server.func websocketDidReceiveMessage(socket: WebSocket, text: String) {}– it’s called when a client receives a text frame from a connection.func websocketDidReceiveData(socket: WebSocket, data: Data) {}– it’s called when a client receives a binary frame from a connection.
Sending messages to a WebSocket server
Now, you can establish a connection with a server. Depending on its implementation, as soon as it takes place you might have to send additional info. There’s a simple method for that:
 private func sendMessage(_ message: String) {
    socket.write(string: message)
  }
Negotiating a connection – handshake Message
One of the requirements you may encounter is to send, so-called, handshake Message. It’s a bridge that connects HTTP with WebSockets. It allows you to negotiate the details of a connection. A WebSocket server needs to make sure it understands what a client asks about. Otherwise, security problems may occur.
func websocketDidConnect(socket: WebSocketClient) {
    switch type {
    case .trade:
      tradesocketDidConnect()
    }
  }

  private func tradesocketDidConnect() {
    guard let handshakeMessage = Constants.handshakeDictionary.stringFromJSON() else { return }

    sendMessage(handshakeMessage)
    sendMessage(setupInitialState(for: .initAggregatedOffers))
    sendMessage(handshakeMessage)
    sendMessage(setupSubscribe(for: .aggregatedOffer))
  }
Negotiating details of a connection enables downloading data from a server.
Receiving content from a server
Now, you must implement a websocketDidReceiveMessag method. For example, with the following code:
 func websocketDidReceiveMessage(socket: WebSocketClient, text: String) {
    switch type {
    case .trade:
      let model = tradesocketDidReceiveMessage(text: text)
      viewDelegate?.tradesocketDidReceiveMessage(model: model)
    }
  }
From the WebSocket server on iOS, you get here a regular text that can be converted into a JSON file if needed.
 private func tradesocketDidReceiveMessage(text: String) -> AggregatedOfferTouple? {
    if let handshakeMessage = Constants.handshakeDictionary.stringFromJSON(), text == Constants.handshakeCid {
      sendMessage(handshakeMessage)
      return nil
    } else if text.contains(Constants.initAggregatedOffersRid), let data = text.data(using: .utf8) {
      return setupInitAggregatedOffers(with: data)
    } else if text.contains(Constants.aggregatedOfferChannel), let data = text.data(using: .utf8) {
      return setupAggregatedOffer(with: data)
    } else {
      return nil
    }
  }
Depending on what text you receive, you should take up different actions. For example, it may turn out that you need to negotiate details of the connection with the server, again. In order to receive particular data, you must convert String do Data first. Next, using JSONDecoder, you will receive a data model you need:
guard let model = try? JSONDecoder().decode(Order.self, from: data) else { return nil }
Disconnecting from a server
You should also know how to break a connection when you don’t need it anymore. For example, it can take place when a viewWillDisappear(_ animated: Bool) method is being called out.
override func viewWillDisappear(_ animated: Bool) {
    super.viewWillDisappear(animated)

    viewModel.disconnectSocket()
  }
Use the method below to disconnect:
func disconnectSocket() {
    socket.disconnect()
  }
What if the iOS WebSocket is not working?
In such a case, you need to check one thing. Go to your info.plist and change arbitrary loads to YES – info.plist -> App Transport Security Settings > Allow Arbitrary Loads. This can be helpful because Apple blocks all non-https URLs by default.
Exemplary template for SocketManager
If you develop a commercial mobile app that requires using WebSockets, try this solution out and use the code below:
import Starscream

typealias ModelTouple = (buyOrders: [Model], sellOrders: [Model])

enum SocketViewType {
  case type
}

protocol SocketManagerType {
  var viewDelegate: SocketManagerDelegate? { get set }
  func setupSocket()
  func disconnectSocket()
}

protocol SocketManagerDelegate: class {
  func socketDidReceiveMessage(model: ModelTouple?)
}

final class SocketManager {
  weak var viewDelegate: SocketManagerDelegate?

  private let type: SocketViewType

  private var socket: WebSocket!

  init(type: SocketViewType) {
    self.type = type
  }

  private func sendMessage(_ message: String) {
    socket.write(string: message)
  }

  private func sendData(_ data: Data) {
    socket.write(data: data)
  }

  private func socketDidConnect() {}

  private func socketDidReceiveMessage(text: String) -> ModelTouple? {}
}

extension SocketManager: SocketManagerType {
  func setupSocket() {
    socket = WebSocket(url: URL(string: APIConstants.socketBaseURL)!)
    socket.delegate = self
    socket.connect()
  }

  func disconnectSocket() {
    socket.disconnect()
  }
}
extension SocketManager: WebSocketDelegate {
  func websocketDidConnect(socket: WebSocketClient) {
    switch type {
    case .type:
      socketDidConnect()
    }
  }

  func websocketDidDisconnect(socket: WebSocketClient, error: Error?) {}

  func websocketDidReceiveMessage(socket: WebSocketClient, text: String) {
    switch type {
    case .type:
      let model = socketDidReceiveMessage(text: text)
      viewDelegate?.socketDidReceiveMessage(model: model)
    }
  }

  func websocketDidReceiveData(socket: WebSocketClient, data: Data) {}

}
Real-time communication – when should you use WebSockets on iOS?
Efficient client-server communication is essential in mobile apps. Users don’t like waiting for the content to download. The longer it takes, the more they are likely to leave the app and never get back.
In many cases, the send and receive pattern is enough to ensure the best user experience. However, WebSockets are a much better option in scenarios with fast or often changing data.
Displaying scores of sporting events, making bets in real-time, playing the stock market, or buying cryptocurrencies are good examples of actions when WebSockets come in handy.